
Overview
User Management is the responsibility of the Plan Sponsor. For data integrity and security purposes, CMS’ RDS Center does not alter registered user information on the user’s behalf.
Due to the sensitive nature of this data, the user should contact the RDS Center directly when assistance is required. One individual should not contact the RDS Center on another individual’s behalf. Do not include any Protected Health Information (PHI), as defined in the Health Insurance Portability and Accountability Act (HIPAA), or Personally Identifiable Information (PII) in the correspondence, such as User ID, Password, MBI, SSN, DOB, etc.
This section provides an overview of the following topics for managing registered user information:
- User Information That Can Be Changed
- User Information That Cannot Be Changed
- Multi-Factor Authentication (MFA)
- Actuary Name Changes
- Notification of User Information Changes
User Information That Can Be Changed
- First Name
- Middle Initial
- Last Name
- Job Title
- Phone Number
- Email Address
- Mailing Address
- Password
- Passwords can be changed five (5) times in a 24-hour period.
- Security Questions and Answers
- Security Questions can only be changed once in a 24-hour period.
User Information That Cannot Be Changed
- Login ID
- Date of Birth
- Social Security Number
- American Academy of Actuaries Membership Number
Multi-Factor Authentication (MFA)
For an overview and step-by-step instructions for managing your Multi-Factor Authentication (MFA) settings, including your text-enabled device number, refer to Multi-Factor Authentication.
Actuary Name Changes
Actuary name changes must be registered with the American Academy of Actuaries before being changed with the Centers for Medicare & Medicaid Services' (CMS') Retiree Drug Subsidy (RDS) Center. It may take up to two weeks for the RDS System to match the Academy's database.
If the Actuary has already attested to Benefit Options, the Plan Sponsor is not required to update the Actuary's information during the plan year.
Notification of User Information Changes
When an RDS Secure Website user changes any personal information, that user receives an email notification that a change has been made.
Step-by-Step Instructions
This section provides step-by-step instructions to manage user information, including personal information, your Password, and Security Questions:
- Manage User Information
- Change Password
- Forgot Password
- Change Password If Account Is Locked
- Change or Reset Security Questions
- Verify Email Address
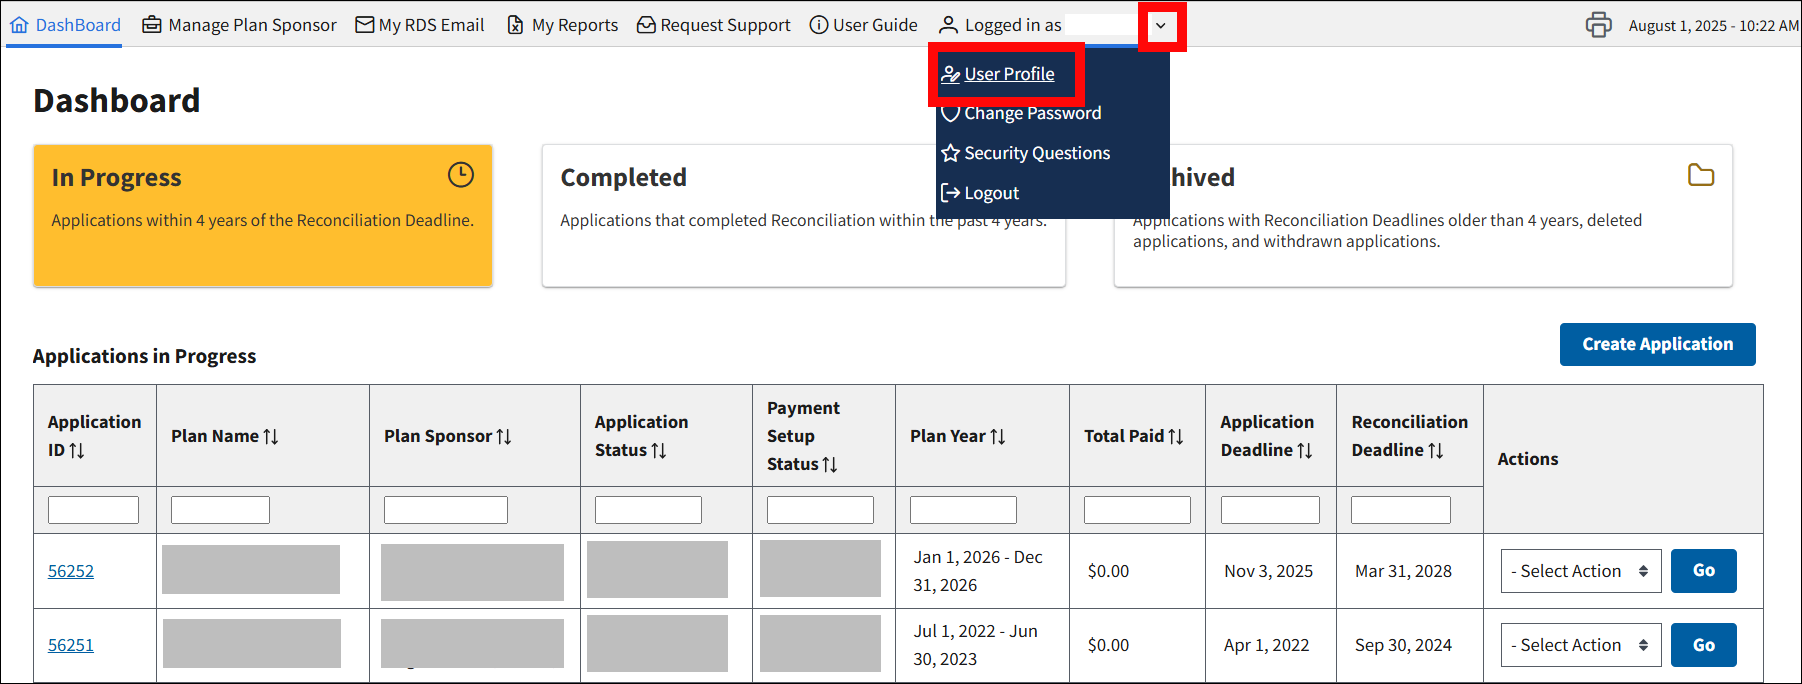
Manage User Information
To access the RDS Secure Website, and navigate to the Dashboard page, review instructions to access the RDS Secure Website.
From the Dashboard page:
-
Select the down arrow next to your user name in the Top Navigation menu and select User Profile.
On the User Profile page:
An asterisk (*) indicates a required field.
Information that cannot be changed will be displayed as view only.
- *Enter the new User Information and/or Mailing Address, as needed.
-
Select Save to save your User Information and/or Mailing Address changes or select Cancel to reject the changes.
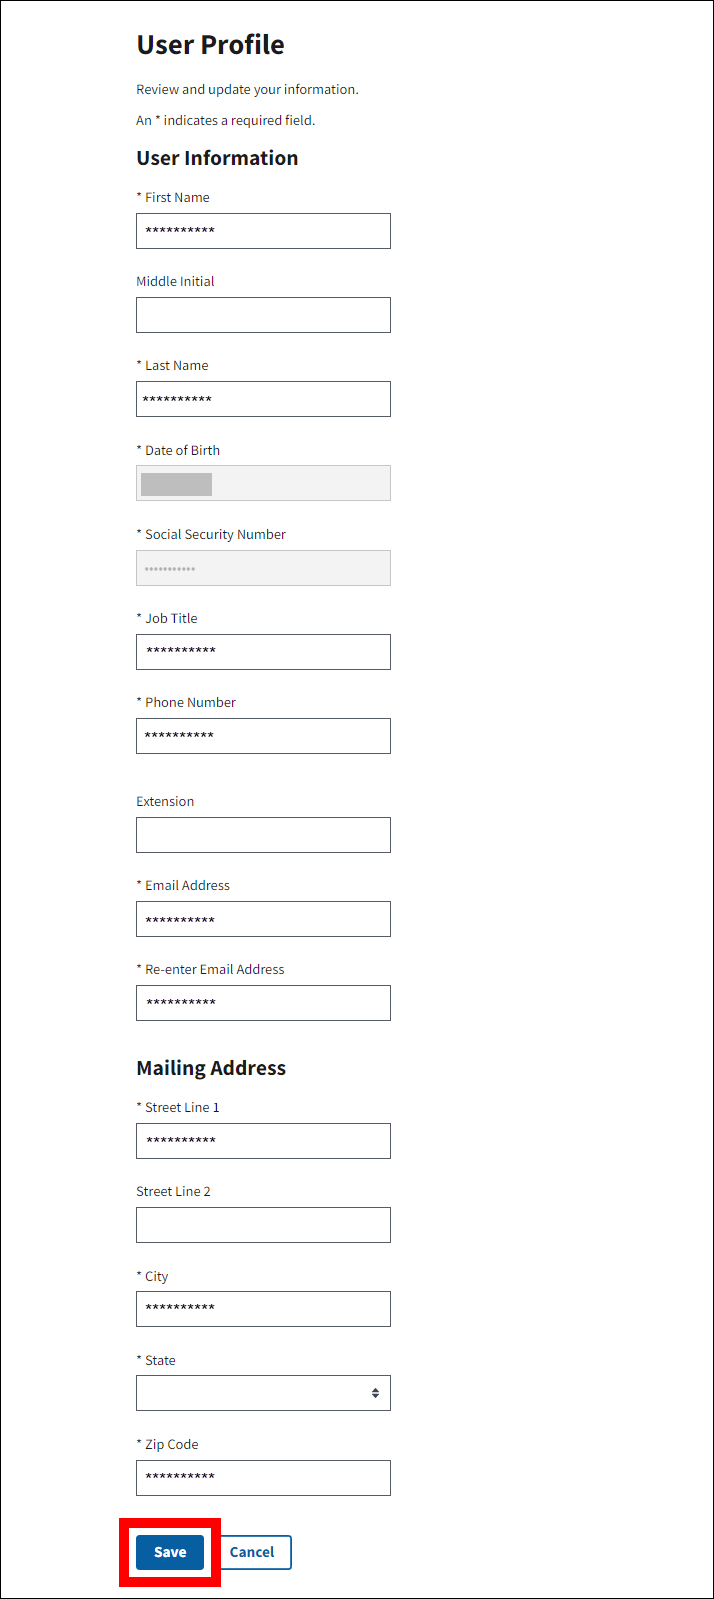
-
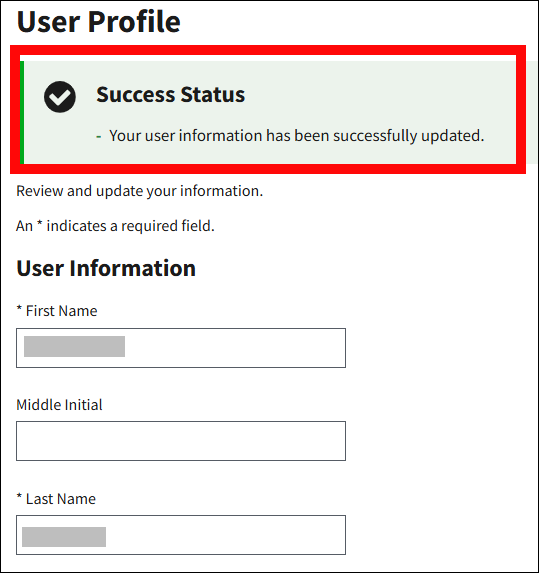
The User Profile page refreshes to display a Success Message stating that the information has been successfully updated.
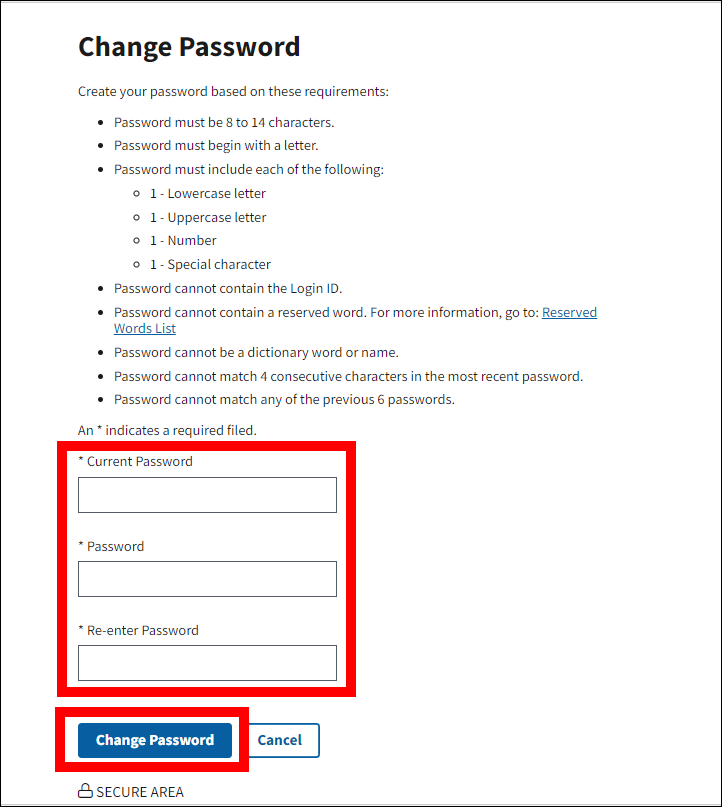
Change Password
To access the RDS Secure Website, and navigate to the Dashboard page, review instructions to access the RDS Secure Website.
From the Dashboard page:
-
Select the down arrow next to your user name in the Top Navigation menu and select Change Password.

On the Change Password page:
An asterisk (*) indicates a required field.
- *Enter your Current Password.
- *Enter a New Password based on the Password Requirements.
- *Re-enter New Password for verification.
-
Select Change Password to proceed or select Cancel to return to the Dashboard page without changing the password.
-
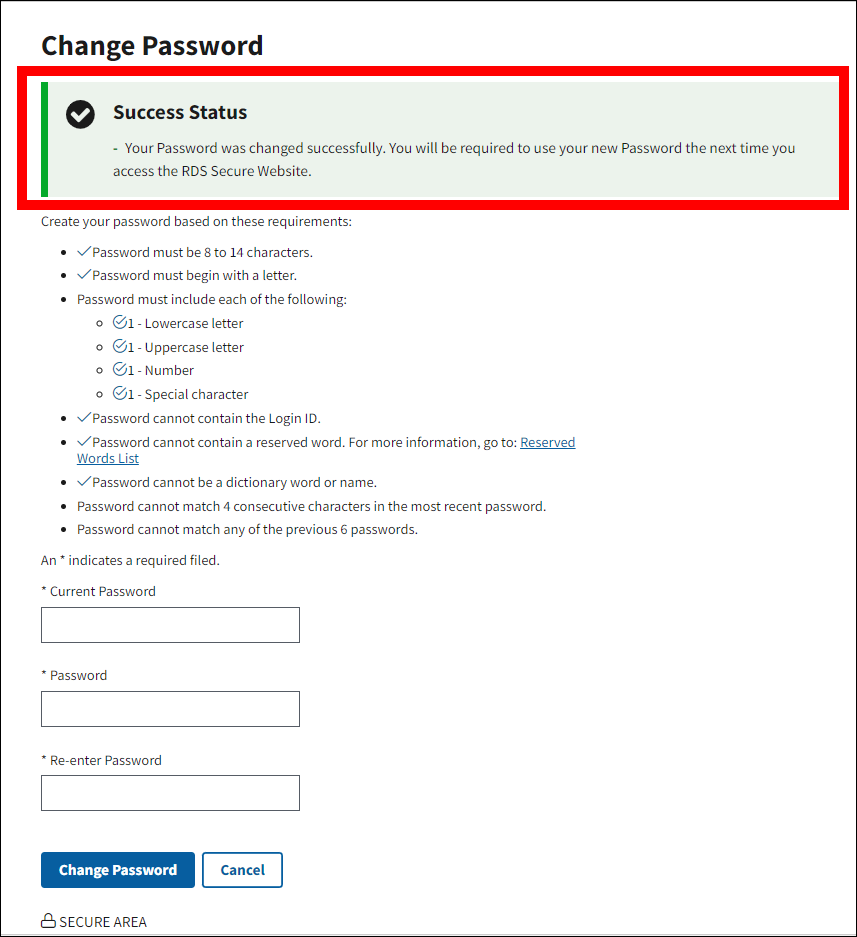
The Change Password page refreshes to display a Success Message stating that the information has been successfully updated.
Forgot Password
Note: If CMS' RDS Center has detected an issue with your email address, you may be asked to verify it in the process of resetting your Password.
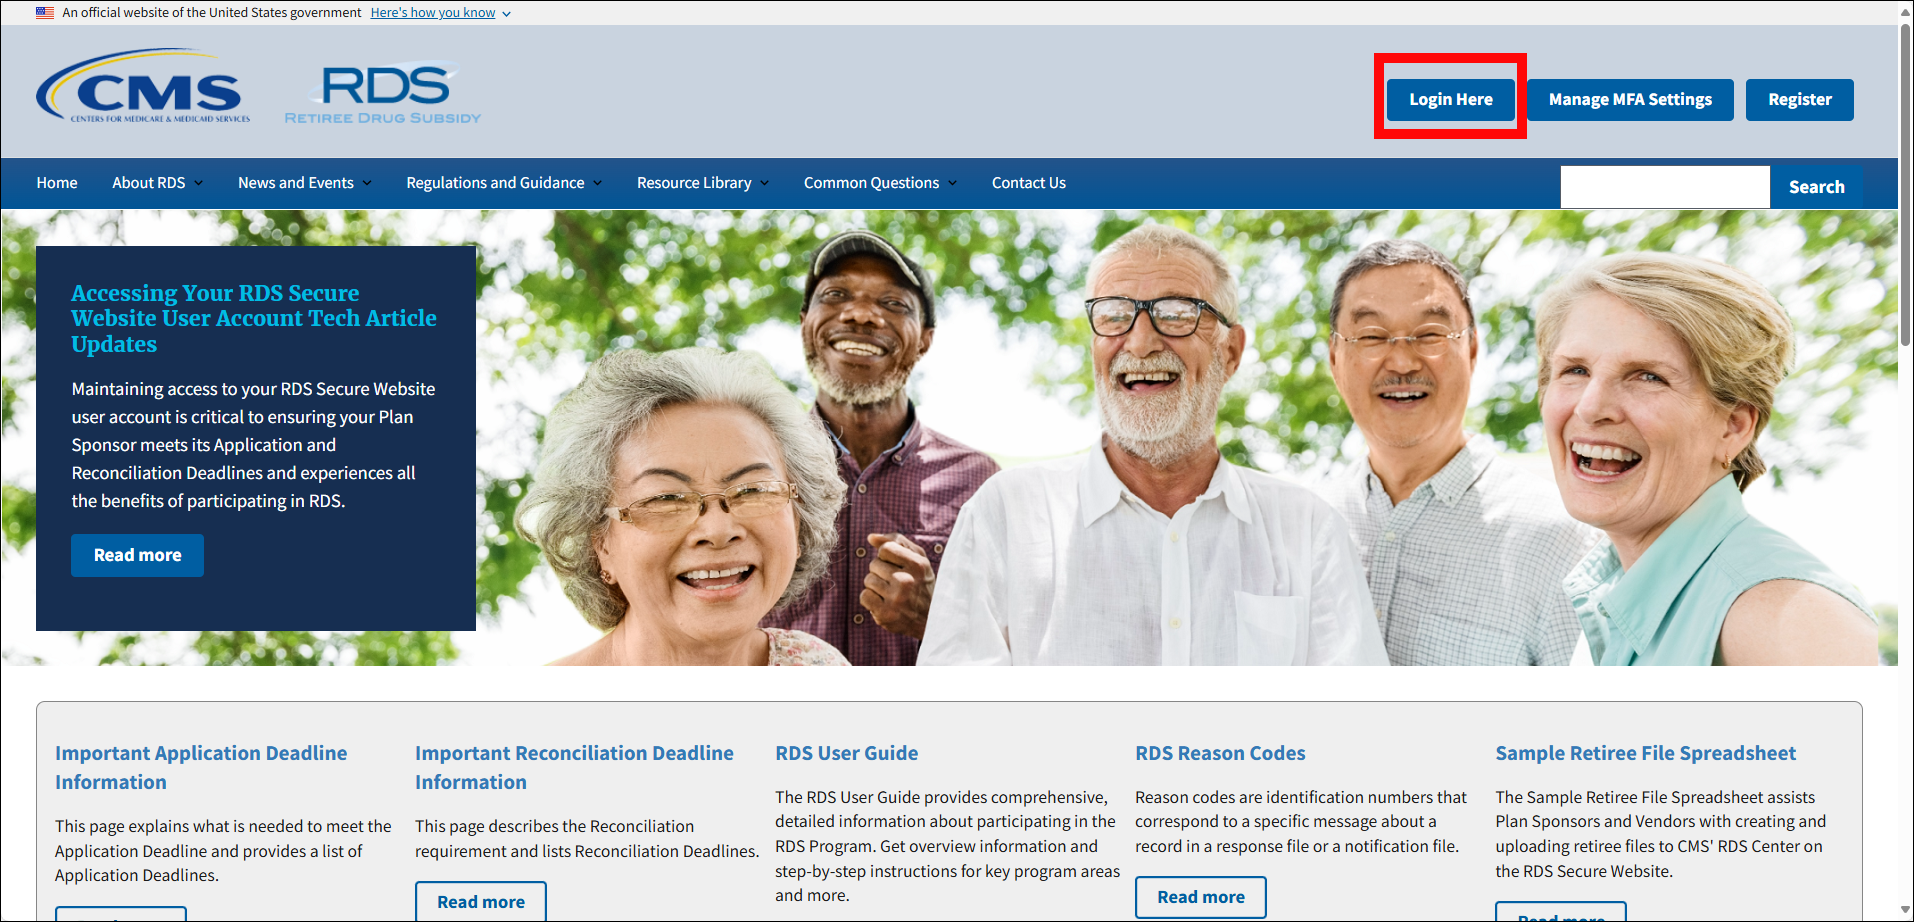
On the RDS Program Website homepage (http://www.rds.cms.hhs.gov):
-
Select Login Here.
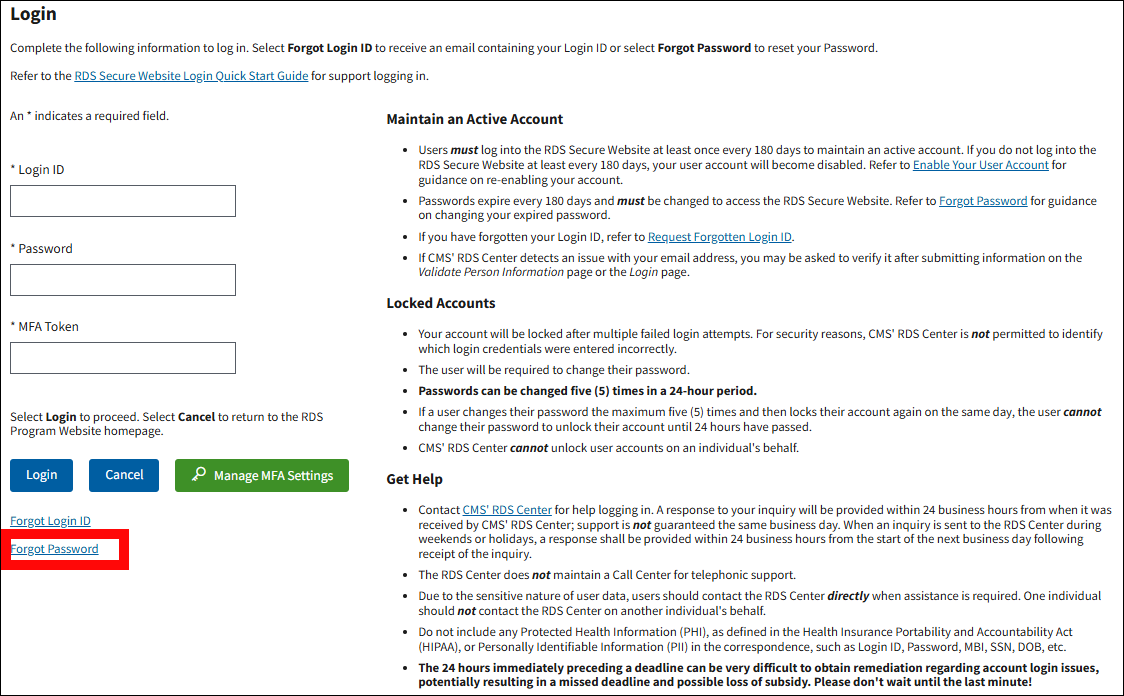
On the Login page:
-
Select Forgot Password to reset your Password.
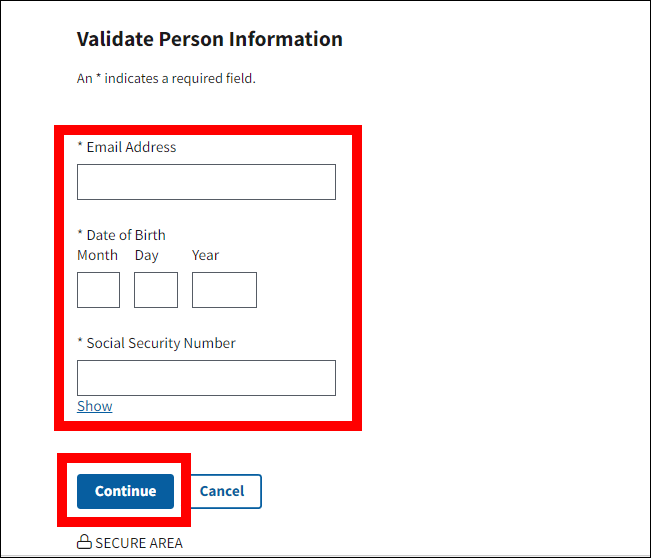
On the Validate Person Information page:
An asterisk (*) indicates a required field.
- *Enter your Email Address.
- *Enter your Date of Birth.
- *Enter your Social Security Number.
-
Select Continue to proceed with resetting your Password or select Cancel to return to the RDS Program Website homepage.
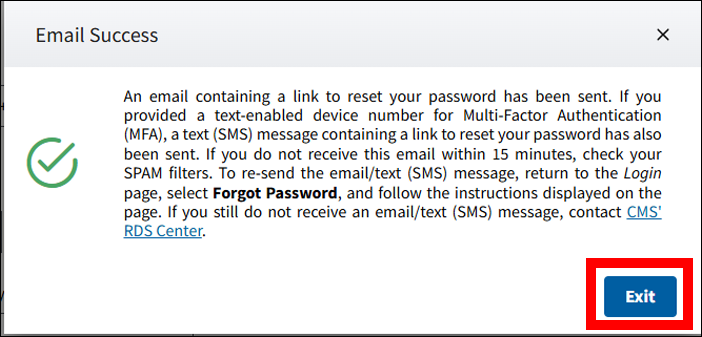
On the Email Success pop-up:
-
A Success message displays stating that an email containing a link to reset your Password has been sent. If you provided a text-enabled device number to CMS' RDS Center, a text (SMS) message containing a link to reset your password has also been sent. If you do not receive this email within 15 minutes, check your SPAM filters. To re-send the email/text (SMS) message, return to the Login page, select Forgot Password, and follow the instructions displayed on the page. If you still do not receive an email/text (SMS) message, contact CMS’ RDS Center. Select Exit to proceed to the RDS Program Website homepage.
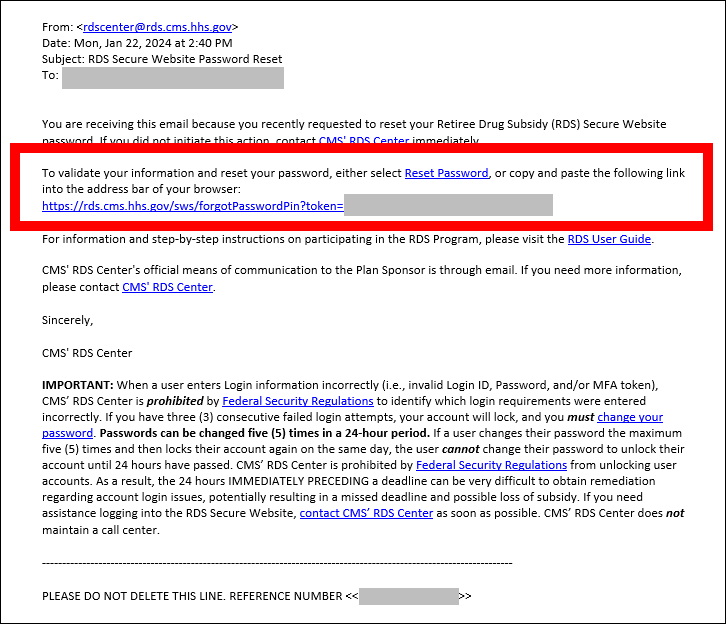
In the RDS Secure Website Password Reset email:
-
Select Reset Password or copy and paste the reset link into the address bar of your browser.
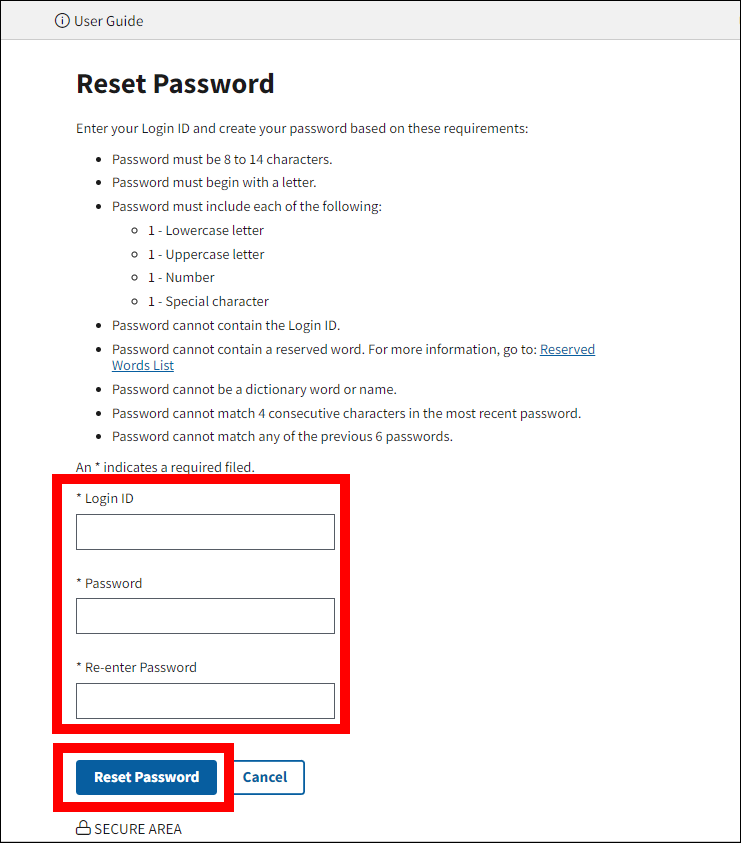
On the Reset Password page:
- *Enter your Login ID.
- *Enter a New Password based on the Password Requirements.
- *Re-enter New Password for verification.
-
Select Reset Password to change your Password or select Cancel to exit the process.

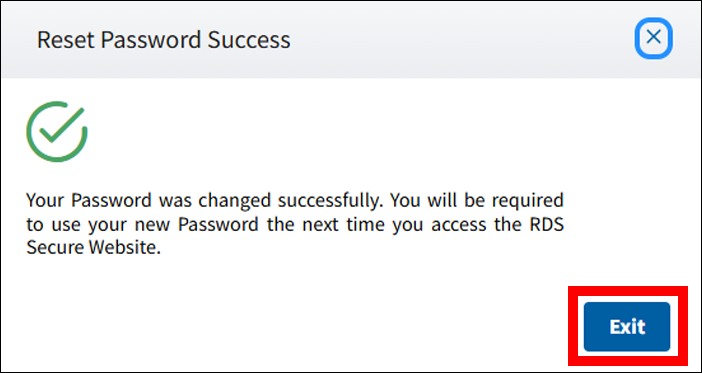
On the Reset Password Success page:
-
Select Exit to proceed to the Login page.

Change Password If Account Is Locked
Note: If CMS' RDS Center has detected an issue with your email address, you may be asked to verify it in the process of resetting your Password.
On the RDS Program Website homepage (http://www.rds.cms.hhs.gov):
-
Select Login Here.

On the Login page:
-
Select Forgot Password to reset your Password.

On the Validate Person Information page:
An asterisk (*) indicates a required field.
- *Enter your Email Address.
- *Enter your Date of Birth.
- *Enter your Social Security Number.
-
Select Continue to proceed with resetting your Password or select Cancel to return to the RDS Program Website homepage.

On the Email Success pop-up:
-
A Success message displays stating that an email containing a link to reset your Password has been sent. If you provided a text-enabled device number to CMS' RDS Center, a text (SMS) message containing a link to reset your password has also been sent. If you do not receive this email within 15 minutes, check your SPAM filters. To re-send the email/text (SMS) message, return to the Login page, select Forgot Password, and follow the instructions displayed on the page. If you still do not receive an email/text (SMS) message, contact CMS’ RDS Center. Select Exit to proceed to the RDS Program Website homepage.

In the RDS Secure Website Password Reset email:
-
Select Reset Password or copy and paste the reset link into the address bar of your browser.

On the Reset Password page:
- *Enter your Login ID.
- *Enter a New Password based on the Password Requirements.
- *Re-enter New Password for verification.
-
Select Continue to change your Password or select Cancel to exit the process.
On the Reset Password Success page:
-
Select Continue to proceed to the Login page.
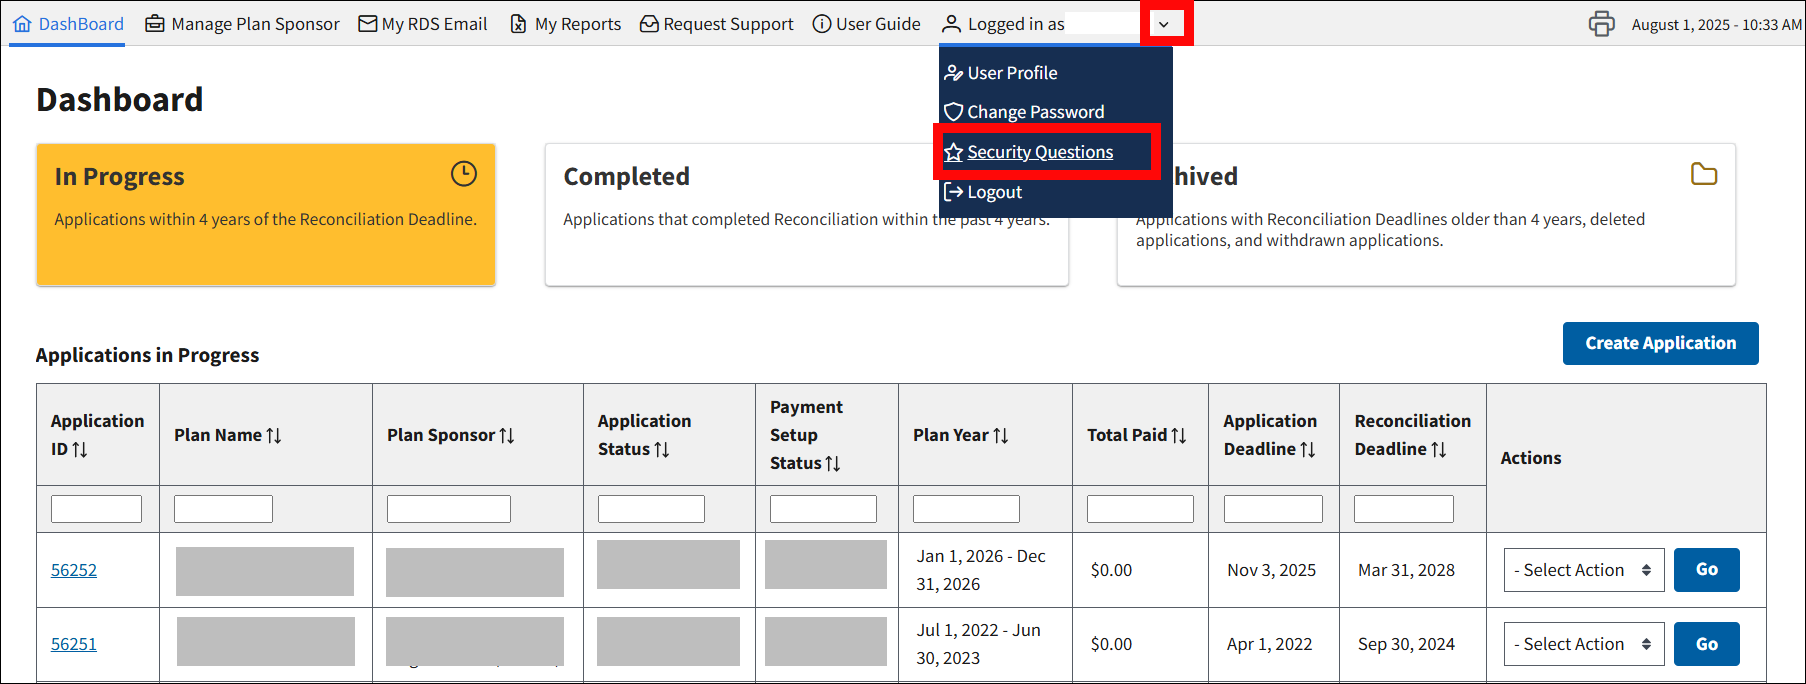
Change or Reset Security Questions
To access the RDS Secure Website, and navigate to the Dashboard page, review instructions to access the RDS Secure Website.
From the Dashboard page:
-
Select the down arrow next to your user name in the Top Navigation menu and select Security Questions.
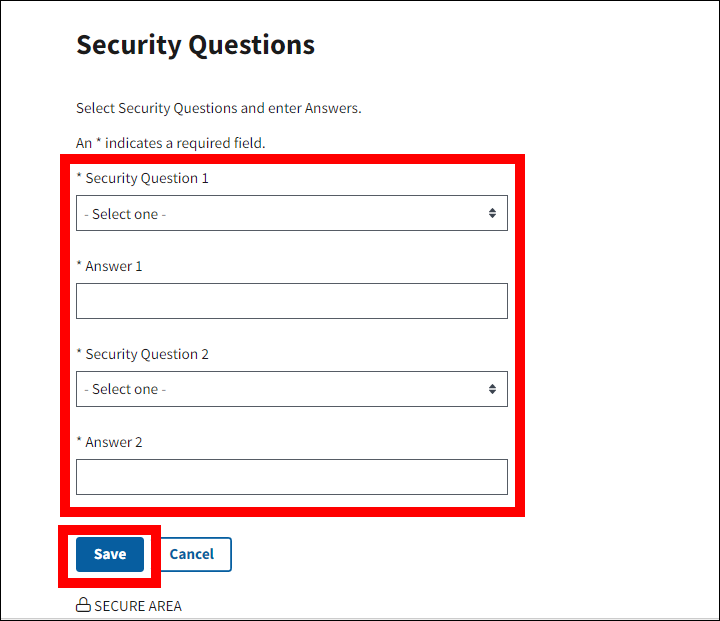
On the Change or Reset Security Questions page:
An asterisk (*) indicates a required field.
- *Select Security Question 1.
- *Enter Answer 1.
- *Select Security Question 2.
- *Enter Answer 2.
-
Select Save to proceed or select Cancel to return to the Dashboard page.
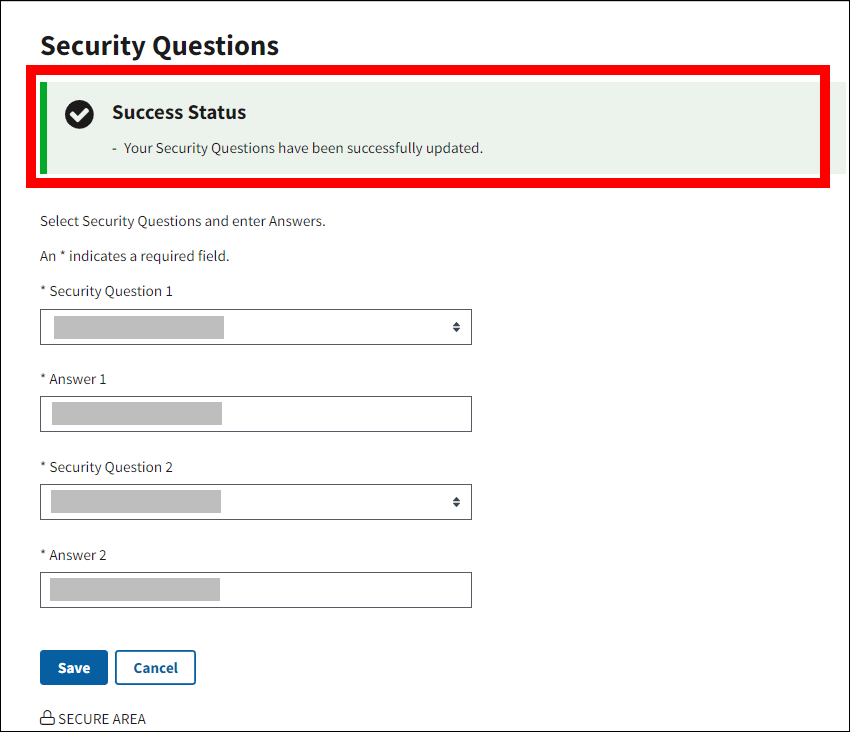
-
The Security Questions page refreshes to display a Success message stating that your Security Questions have been updated.
Verify Email Address
Note: If CMS' RDS Center detects an issue with your email address, you may be asked to verify it after submitting information on the Validate Person Information page or the Login page. If your account is also locked due to failed Password attempts, you will receive an error message on the Login page instructing you to select either the Forgot Login ID or Forgot Password link. You will then be directed to the Validate Person Information page to verify your information and then validate your email address.
On the Review Email Address page:
-
Review the email address listed in the Current Information section.
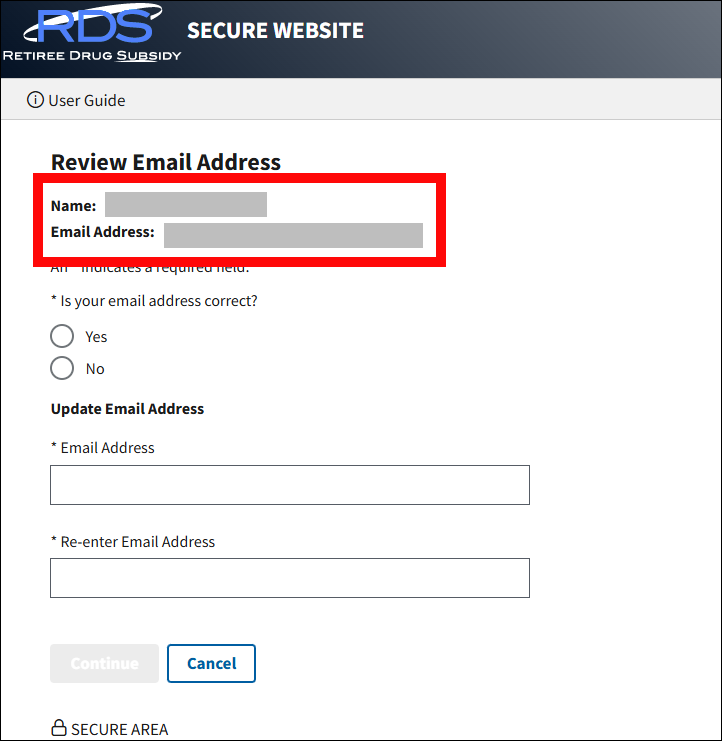
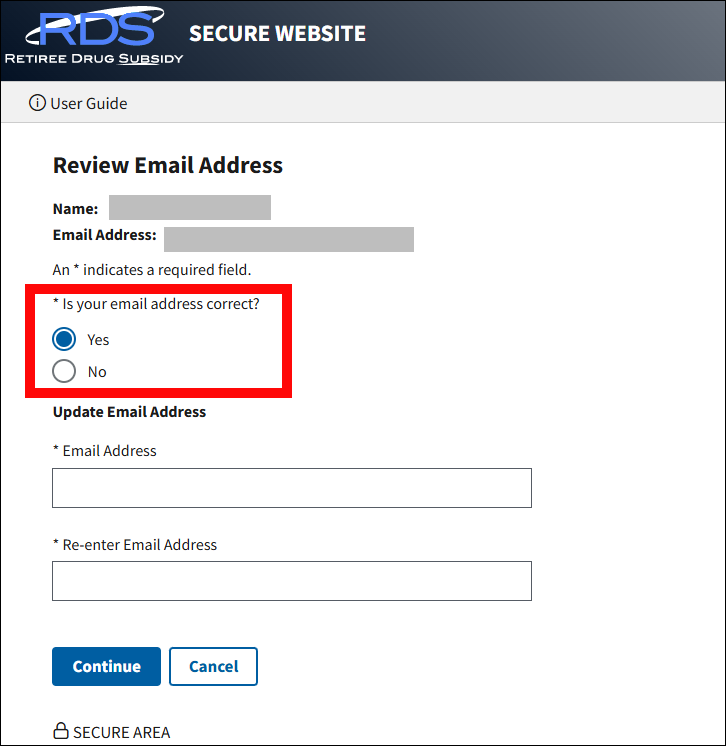
An asterisk (*) indicates a required field.
-
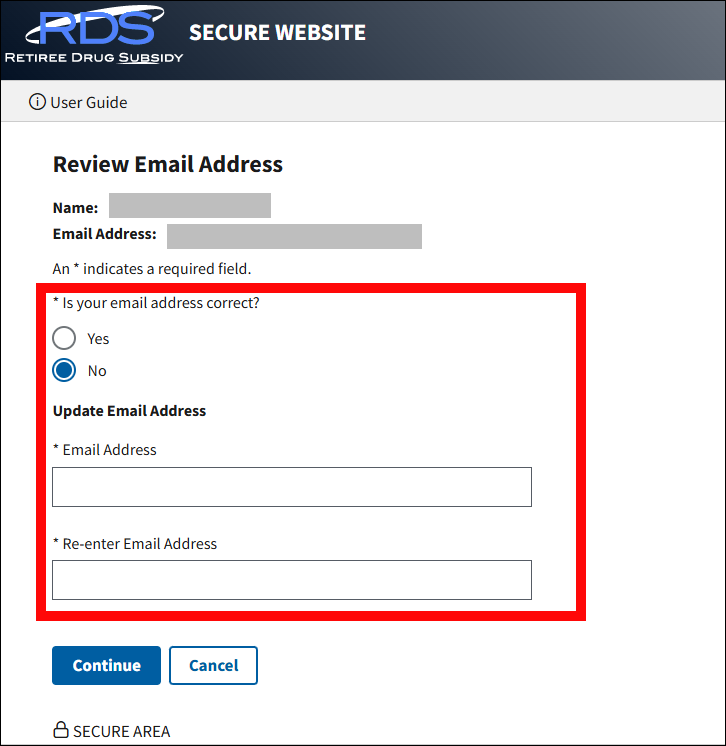
If the email address is correct, select the Yes radio button; if the email address is incorrect, select the No radio button.
- *If you selected No, enter your new email address.
-
*If you selected No, re-enter your email address.
-
Select Continue to proceed or select Cancel to return to the previous page without validating your email address.

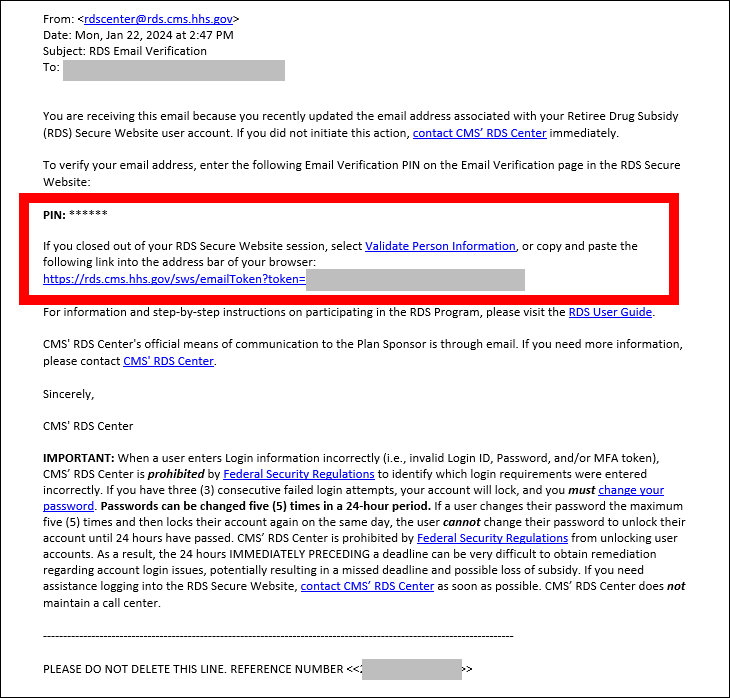
Selecting Continue will send an email from CMS' RDS Center to the address provided containing a PIN to verify the address. If you do not receive this email within 15 minutes, check your SPAM filters.
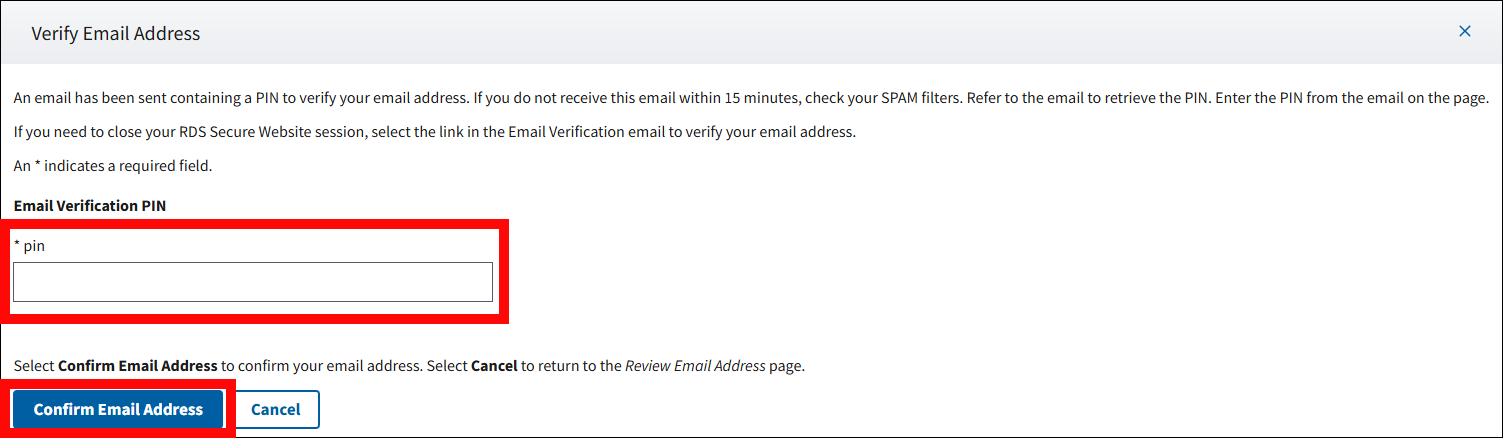
On the Verify Email Address pop-up:
An asterisk (*) indicates a required field.
-
*Enter the PIN contained in the email from CMS' RDS Center.
Note: If you need to close your browser or if your RDS Secure Website session expires before entering the PIN on the Email Verification page, you may select the link in the email from CMS' RDS Center to verify your email address through the Validate Person Information page. You will then need to log into the RDS Secure Website.
Both the PIN and the link in the email from CMS' RDS Center can only be used once. If the PIN or link expires, you will be directed to an error page and will need to follow the instructions to receive a new PIN/link.
-
Select Confirm Email Address to proceed or select Cancel to return to the Review Email Address page.
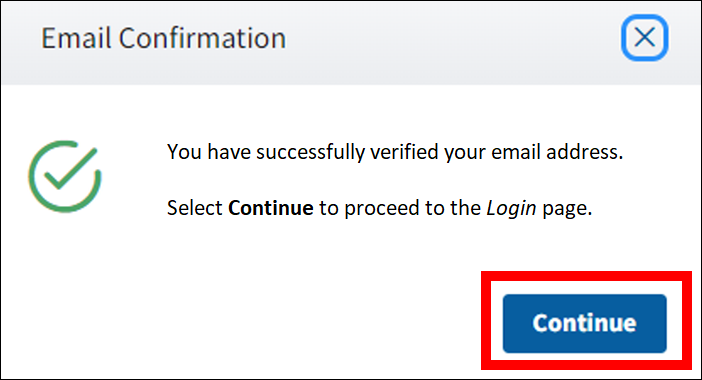
On the Email Confirmation pop-up:
-
A Success message displays stating you have successfully verified your email address. Select Continue to proceed to the Login page.